Thursday, November 24, 2016

Ladies Fun Tee from Sew by Pattern Pieces (Review and Giveaway)

If anyone looks back through my blog you will see that I have long been a fan of the patterns from Lauren at Sew by Pattern Pieces.  I was super excited to hear that she was drafting my all time favourite tee pattern in grown up sizes, after all everyone needs a perfectly fitting tee.  And a perfectly fitting tee this one is.
There are so many things I love about the #11100 Ladies Fun Tee:
- Covers a massive size range Au 6-26, US 2-22, Eu 34-54
- It has a separately drafted front piece for each cup size A-G (more on that shortly)
- Three different neck options (round, scoop and V)
- Loads of sleeve options: plain sleeves in cap, short, 3/4 and long length, gathered short sleeve and princess sleeve
- Fitted or more relaxed fit cut lines
- Slightly curved hem option
- Layers for selective printing
Is that enough?  

So why the separate front pieces for each cup size?  This takes all the headache out of getting the perfect fit.  There are beautifully detailed instructions in the tutorial on how to measure accurately and choose the right cup size for you.  The may not be the bra size you wear but trust the pattern IT WORKS!!!  My other trusty tip here is measure yourself with the bra you are most likely to wear with the shirt when finished, I found that my measurements varied a lot between different bras.  Once you have worked out your size you are done!  No hoping that you measure a B cup as that's what the pattern is drafted for.  No hoping you can get away with the fit because the fabric is stretchy and you're not that far off.  No more full bust or small bust adjustments, just cut and sew!!!  PERFECTION!

I'll admit I got slightly addicted to this pattern during testing, partly due to attention to detail taken in getting the fit just right during testing and partly because I wanted a whole wardrobe of new tees for summer ;-).    So what did I make.  I'm in love with the fitted version with a scoop neck, although I'm looking forward to trying the other options as well.  I made a size 8 through the shoulders and bust drafted out to a 10 in the waist/hip, which is where my measurements sit on the size chart. 


I couldn't help but try the gorgeous wee puffed sleeve version, I still have plans to put some heat transfer vinyl on this one but I can't make up my mind what to put on it, lol.  This tee shows how the fit isn't only lovely through the front but also in the back where there's not a lot of fabric pooling at the waistline.

By this stage I was ready to break out this fabulous panel that I'd been hoarding for quite some time.  I now have a new favourite tee of all time :-)
But don't take my word for it, go and check out all the other gorgeous tester photos in the tester round-up blog post, this tee seriously looks amazing on everyone.

Don't miss any of the posts on the Sew by Pattern Pieces Fun Tee Roundup Tour
(Note: the links below will not work until their scheduled day, but feel free to click through and check out the rest of their blogs anytime!)

Day 1 Tuesday 22nd - MeMade
Day 2 Wednesday 23rd - Anne-Mari Sews and Sewing by Ti
Day 3 Thursday 24th - By Breenah and Kiwi Crafty Chemist
Day 4 Friday 25th - Kutti Couture


Want to win not only a copy of this pattern but also a copy of the latest issue of One Thimble e-zine which contains a fabulous article by Lauren on doing a FBA as used here on any pattern?  Then enter the rafflecopter giveaway below.  a Rafflecopter giveaway


Wednesday, February 24, 2016

KCW Day 1 & 2: Lego Rash top and swim shorts

I really wasn't sure if I would have a chance to join in with KCW this time around but things have come together and so far I'm doing ok, things could still fall to pieces later in the week though ;-)

I have been promising Mr A new togs with this lego fabric since I grabbed it in a destash over a year ago, but hey good things take time.   Then along came KCW with a toy theme, and Mr A's current rash top is falling to pieces so I finally got around to it :-)
For the rash top I fell back to my current favourite too pattern, the Fun Tee from Sew by Pattern Pieces.  This is drafted as a girls pattern but the fit is so fantastic that I simply altered it to a more 'boy fit' by straightening out the side seams to remove the waist shaping.  For Mr A I made a size 5 with 7 length, his measurements were between the 5 and 6 around so I sized down as this is for a fitted rash top.  The only other alteration I made was to widen the neckband, although I didn't need to lower the neckline as I thought I might.  The neck band isn't sitting too well at the moment but I think that will settle down once it's been wet.

For the Swim shorts I wanted to add the lego fabric as a panel down the sides so I used the Little Kiwis Closet Skinny Legs pattern as it already has this built in as a pattern option (and I was feeling super lazy).  I have also always found these to be a good fit on Miss M and I was hoping they would work here too.  I fully lined the shorts (apart from the side panels) with some random leotard lining I found in stash (I assume it came from Mum at some stage).  These are a size 5 cut to mid thigh length (I kind of guessed the length as I didn't want really short boy legs but didn't want them to go right down to just about the knee either).
And here it is all together.  I'm really pleased with the fit on, and I don't think there is any chance of losing him in the crowds at the pool!
The swimming cap I blogged about here, it's a fab free pattern from Sew by Pattern Pieces.
Most importantly he loves them!!

Monday, February 22, 2016

FO Legends Top by Sew Straight and Gather

Recently I was very fortunate to have the opportunity to test the new Legends Top and Dress pattern from Terri at Sew Straight and Gather.  There are so many things to love about this pattern but I think my favourite of all is the clean stylish lines and amazing fit.
The pattern is available in sizes 2y-14y for girls (here) and 02-20 for women (here), or you can buy a pattern bundle of both.  I tested the womens version in a size 2 drafted to a 4 int eh waist and 6 in the hip.  This brings me to my first point, because of the clean simple lines of this pattern adjusting to get the perfect fit and silhouette is super easy.  The pattern is drafted for the industry standard B-cup but instructions/links are given in the tutorial for doing a FBA if needed.  The pattern includes sleeveless, short and long sleeved options and can also be made as a dress with the skirt starting at the hip or waist.  I made the top (view A) with short sleeves and I'm thrilled with the result.
All this sounds great right but there is one more secret in this pattern, the front/collar piece is lined and the construction is ingenious leaving all the internal seams fully enclosed.  This makes for such a tidy finish which I love in handmade clothes.
I made my version in a grey/white poly/nylon/spandex stripe and lined the front with a white cotton lycra.  This top was made from an early version of the pattern and the collar has since been adjusted slightly to sit more smoothly round the back of the neck.  (Please excuse the slightly horrid photos).


I really do love this pattern.  I have since bought the girls pattern as it was just what I was after to complete an outfit I have in mind for Miss M, and I also have some lovely grape merino set aside to make a long sleeved top version for myself.  
Check out the tester gallery for the girls and women's patterns, there are so many amazing versions of this pattern popping up already.
Happy sewing. 

Friday, February 12, 2016

FO: Stinger Bodysuit by Sew By Pattern Pieces

I was very pleased recently to be asked to help out with testing the brand new pattern from Lauren at Sew by Pattern Pieces.  Introducing the Stinger Bodysuit, a fabulous swimsuit with zip front, three sleeve lengths and optional skirt, and comes in sizes 1-14y.  As always with Lauren's patterns the tutorial is very clear to follow and there is a lot of information about fabric choice and loads of helpful tips for getting a professional finish.  The thought of sewing a zip into lycra would send lots of people running for the hills but don't.  The technique used in this pattern makes it easy and there is a fabulous video tutorial for those who find visual instructions easier.  I love that there is a tab at the bottom of the zip for a nice finish, and a zipper guard to stop the zip rubbing, especially once the suit gets wet.
Down here in New Zealand while we are lucky to have lots of beaches and pretty good weather, we are also blighted by sitting right under a huge ozone hole meaning sun safety is a huge issue here.  My two wee monkeys are also blessed with fair skin, especially Miss M, who to add to that has decided wearing a tee over her togs at the beach is a no-go.  In comes the Stinger bodysuit, instant cover-up, no more risk of burnt shoulders and she loves it - woohoo.  I decided against making the skirted option this time around but it is super cute and I'm sure I'll be adding one to her wardrobe before long.
For Miss M I made the long sleeved version in size 4 with 6 length.  She adores it and couldn't wait to try it out on our next beach trip.  Disclaimer:  I got her to take her sunhat off for the photos ;-)


But wait there's more.  Along with the Stinger Bodysuit comes the Jellyfish Swim Cap, again in multi sizes, fully tested and the best part of all is it's FREE.  This is the best stash buster for knit scraps ever, there is no easier way to find your child in a crowded pool than for them to have a swim cap that stands out from the crowd.  This is a super fast sew, as in I made one while cooking dinner, and the kids love them.  Miss M had to have one to match her new swimsuit :-)


And of course Mr A was not to be left out.  I dug out some lego fabric and he is in love with his new cap and won't stop wearing it.  He was also super excited to have people comment on it at his swimming lessons :-)

So how do you get your hands on this awesome freebie?  You just have to pop over to Facebook and join the Sew By Pattern Pieces Sewing Circle group, easy as that!  It's also a perfect way to try out Lauren's pattern before you rush out and buy them all!

HAPPY SEWING :-)

Thursday, November 26, 2015

FO: Skip Skirt from Sew by Pattern Pieces

A while ago I reviewed the Fun Tee, the first pattern released by Lauren of Sew By Pattern Pieces.  Anyone who has read that review will know that I kind of went a little fan girl over it.  Of course I jumped at the chance of working with Lauren again in testing her newly released Skip Skirt (and just quietly I'm still a little fan girl).  Once again Lauren's knowledge of the industry shines through in another fabulous pattern.
So the vital statistics of the Skip Skirt?  The pattern covers sizes 1-12y.  There are seven (yes 7) different views all of which sit on a nice yoke and include both gathered and non-gathered option, single or double tiers, and two different pocket options.  Not only that but the Skip Skirt also includes a leggings pattern as well, yes that's right another whole pattern is included.  The leggings come in 3 lengths and can be made either be attached to the skirt or separate.  And as if that's not enough, but wait there's more!  Yes that's right there's more, no you don't also receive a free set of steak knives but if you also buy the fabulous Fun Tee pattern (which you NEED anyway), then the skirt pattern is designed to fit seamlessly onto  the tee to make a dress (with any of the 7 views of skirt).  I've now well and truely lost count of all the possible combinations so let's just call this a full capsule wardrobe right there ;-).
The pattern comes with a full and comprehensive tutorial with clear illustrations for making all the possible options.  Not only does it have a comprehensive body measurements table but also a complete table of finished garment measurements so you can get a finished article which is exactly what you are after in terms of fit.  Alongside all this is a section on fabric selection and preparation, and more tips on getting a fabulous finish with knit fabrics than you can shake a stick at.  The pattern itself comes with layers option for printing and also a list of which pages are required for which of the pattern options.  What more could you ask for.

So what did I actually make.  First up is the single tier gathered skirt with attached knee length leggings.  The pattern includes instructions for a separate waistband for use when attaching leggings, or a fold down elastic waist.  The fluoro floral cotton lycra I used for the skirt DD found hidden away in my stash and begged me to make her something in it.  Although it is a cotton lycra, the skirt is also suitable for stable knits.  The leggings in this case are pin striped cotton/nylon, and a 4-way stretch is required for the leggings.


It was just a touch cold and windy when I took these so excuse the half frozen looking DD.  I should just make a quick note here on the fit on the leggings, these have been adjusted to the perfect fit and I love them.

This is DD's favourite skirt and she wears it all the time to school so the pattern is totally kid approved!

Next up on the cutting table was the unfathered version with patch pockets.  The pockets have a lovely gathered opening which is bound to give a gorgeous finish.  In this case I used a blue leggings style knit and finished the patch pockets with a honeycomb stitch in pink and the elastic waist and hem with pink twin needle.


To be honest I'm not sure which of these skirts is my favourite, they are both so cute on and the yoke sits so nicely on the hip.

And what is that super cute tee that I have teamed with both these skirts?  Why it's one of the many versions of the Fun Tee of course (told you that you needed that pattern too, and there's a bundle deal).

I really can't wait to have the chance to make up the dress version of the tee/skirt combo (just a couple of costumes to make before a school disco next week first).  

Finally once you have rushed off and bought the pattern then go and join the Sew by Pattern Pieces Sewing Circle group on Facebook (PS there may be a great Black Friday coupon code there) and share all your fabulous creations :-)  

Happy Sewing.

Sunday, November 22, 2015

First Japanese Sewing Week

I feel equal parts excited and terrified at being part of the very first Japanese Sewing Week.  If you don't know what Japanese Sewing Week is all about check out this post by Sara of Made By Sara, that not only explains it all but even tells you how to join the link party if you get inspired to start sewing.   There is also an amazing giveaway alongside this week long celebration, this can be found at the end of the post (see how I did that, you have to at least scroll through the hole post to get to it, lol).

So, Japanese Sewing patterns. I first fell in love with them several years ago when I bought a book second hand and then had to wait patiently for Miss M to get big enough to fit any of the patterns.  My collection has since expanded, but I am embarrassed to say that this is the first time I have found the time to actually sew from them.  This was partly due to sizing, partly due to time and partly due to be slightly terrified that my books were all in japanese.  I've sewn from french and german patterns before so how hard could it be right?  Actually not bad at all, I find the illustrations are excellent and with a bit of background sewing knowledge it's enough to get by.  

What did I choose to make?  We are heading into summer (supposedly) down here in NZ so I wanted to make something that Miss M would use throughout the summer months.  I love the clean lines and timeless styles of the japanese patterns, we aren't overly into layers of frills and bows here, so it suits me just fine:-)  

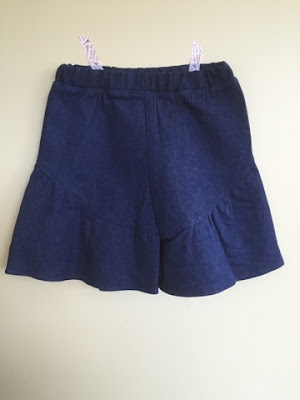
First up I chose some gorgeous shorts, with just enough frill to make them fun without being 'frilly'.  

I am so thrilled with how these came together, a lovely simple sew and once I had worked out what the kanji symbols for back and front were we were all go.  I'm used to adding seam allowances so that wasn't an issue for me and they are clearly marked on the pattern illustrations.  I made these from a mystery light-mid weight denim that I found lurking in my stash.  It is lovely and soft and gives these a nice shape on. 
It was at this time that I learned that Tuttle was sponsoring this event and realised I didn't own any of their amazing pattern books.  My fabulous library came to the rescue and I will be adding this book to my christmas list, it's got many lovely designs in it.
I chose the stand up collar shirt, and decided to make this without the contrast for the collar and cuffs, and used a pretty vintage floral cotton that was hiding in my stash, I'm pretty sure this was gifted to me.
One thing I have noticed from the books I own is that the size measurements do vary slightly between authors.  Using the measurement tables in the books I made the size 110 for the shorts (with slightly shorter elastic) and the size 100 with 110 length for the shirt (I usually make a size 4 width with 5 length for Miss M).  The fit was perfect and I have fallen in love with this outfit, it's so sweet and girly without being over the top.

And this is what most of the photos looked like - sigh!

If by some miracle you have found this post without having followed the whole tour then what you need to do now is go and make a cup of coffee (or your beverage of choice), lock yourself away from all distractions and visit all of these amazing blogs!  The creations they have made for this tour are an amazing source of inspiration!


Plus if you like to win stuff (and who doesn't) then click here to entera Rafflecopter giveaway
A huge thanks to Sara for organising this tour and to Tuttle for sponsoring the first ever Japanese Sewing week.  I hope there are many more to come, I can see my pattern book collection growing exponentially after this last week.

Friday, November 20, 2015

FO: Railyard Scarf

This is another long time finished object.  In the middle of winter Mr A declared that he didn't have a scarf.  After pointing out the scarf that was in his school bag he told me it was itchy (to be fair it wasn't the greatest).  It was freezing and he walks to school most days no matter the weather so I got him to go 'shopping' in my yarn stash.  He chose some gorgeous Vintage Purls green sock yarn.  Now while I love VP yarn I HATE knitting scarves and the thought of knitting one in 4 ply nearly led me to distraction.  I did manage to talk him out of the plain rib scarf though and he chose the Railyard Scarf by Mary Keenan.


I must admit I was pleased with it once it was all blocked out and the boy was happy :-)  I reckon I earn lots of brownie points for actually knitting him a scarf though.